12.26.2011

Barbara's Molasses Crinkles


Every Christmas, I would beg my best friend to make a few batches of her wonderful Molasses Crinkles cookies for me. But now that she is out of the country serving as a missionary in SE Asia, I asked her to share her recipe so I could make them.  You will love these cookies, too, with the molasses flavor melded with fragrant spices, yum!

This recipe is super simple: brown sugar, egg, oil or shortening, and of course molasses mixed with flour, soda, spices and salt. THAT is IT!

After a bit of chilling in the fridge, the dough balls are dipped in sugar and then baked.

Living in the high humid tropical area, my missionary friend has a bit of a challenge to keep the granulated sugar from melting away before they even get to the oven. So, I thought I would try these coating options for her to try.  


Dipping in these various sugars did not hinder the texture or taste at all, except raw sugar did have a little more crunch. My guess is that raw sugar or egg white dip on top and then in granulated sugar would hold up well in high humidity.


Oh, gosh, I miss my friend!  So I'll console myself and make a double batch of these wonderful cookies and munch on them while watching Sleepless in Seattle with my daughter tonight.  Loving this Christmas break....

Print This Recipe!

Barbara's Molasses Crinkles
Makes about 2 1/2 dozens

3/4 C     Vegetable shortening or oil (I used canola oil in this recipe)
1 C        Brown sugar
1            Egg
1/4  C    Molasses
2 1/4 C  All purpose flour
1/4 tsp   Salt
1  tsp     Baking soda
1/2 tsp   Ground cloves
1 tsp      Ground ginger
1 tsp      Ground cinnamon
1/2 C     Granulated sugar for dusting before baking

Cream shortening or oil with egg, brown sugar, and molasses.  Combine flour, soda, salt and spices.  Blend into creamed mixture.  Do not over mix.

Cover the dough and chill 1 hour or until somewhat firm.  Shape into 1 inch balls.  Dip in granulated sugar.

Bake 10 minutes at 350 degrees F.

Make Ahead Tips:


When baking in large volume, measure flour and sugar in weight.  Click here for a baking conversion chart

Dough can be made and chilled in the refrigerator up to three days.  Dip in sugar and bake as directed.

12.23.2011

Creamy Scalloped Potatoes


There are two events I love to cater every December for my church. CERF (Coastal Empire Reformed Fellowship) dinner where South East area Presbyterian pastors, leaders, and their wives gather for their annual Christmas dinner, and IPC staff luncheon. Cooking good tasting meals for God's servants means so much to me, much more than any other shindig I catered as a professional caterer outside the church years ago.

And by request, I made this creamy scalloped potatoes for both events last week, along with fried shrimp, whole New York strip roasted with garlic, fried egg rolls and such.

Fresh thyme infused with heavy cream and rich chicken stock is the key to this tasty dish.


Potatoes were peeled and submerged in water two days prior to cooking. And it took just minutes to slice 8 pounds of potatoes I needed on this Japanese Mandolin Slicer. But a big WARNING first: this is NOT for hurried or novice cooks! I have scars to show you on my fingers so please be CAREFUL when using this. Though this slicer is what we use in our kitchen, there are others which have better safety rating from Amazon consumers.


Once cream and broth mixture is steaming, add sliced potatoes and cook until transparent but not fully cooked.


Put half of the potato mixture into the prepared pan, add cheese, then pour remaining potatoes. Top with more cheese and cover tightly with heavy duty foil and bake. After about 50+ minutes, uncover and bake until cheese browns.


Your family and friends will love this simple and delicious scalloped potatoes. So give this a try for your upcoming gathering.

And Merry Christmas to you all! May God's Peace fill your hearts and your homes this Christmas and New Year!


Creamy Scalloped Potatoes

1 cup heavy cream
1 cup chicken broth
1 Tablespoon corn starch
1/2 teaspoon chopped fresh thyme, more for garnish
2 garlic cloves, grated
1/2 teaspoon fresh ground nutmeg
1 Tablespoon softened butter to grease the pan
2 pounds russet potatoes (about 4 large), peeled and cut into 1/8-inch thick slices
Salt and freshly ground black pepper
1/4 cup grated Parmesan
1 cup of your favorite cheese blend


Preheat the oven to 375 degrees F.

Peel potatoes and submerge them in cold water until ready to slice.

Stir in 1 tablespoon of corn starch in chicken broth, stir to dissolve.

In a large skillet in medium heat, heat up the cream, and fresh chopped thyme, add grated garlic and nutmeg. Add broth and corn starch mixture and stir well. Add salt and pepper to taste. While cream is heating up, butter a 9 x 13 casserole dish and set aside.

Using Janpanese mandolin slicer or a knife, cut peeled potatoes into 1/8-inch thick slices. Put potato slices in the hot cream and broth mixture and cook for a few minutes until potatoes are transparent but not fully cooked (this gives a little head start on the potatoes).

Pour half of the potato mixture into the prepared baking pan, sprinkle 1/2 cup of cheese blend, half of grated Parmesan cheese. Pour remaining potatoes and cream mixture, top with cheeses and tightly cover the pan with heavy duty foil sheet. Bake covered 45 to 50 minutes until potatoes are fully cooked. Uncover and bake until cheese browns, another 5 to 10 minutes.

Let casserole rest for 5 minutes out of the oven, sprinkle with extra chopped fresh thyme and serve immediately.

Make Ahead Tips:

Potatoes can be peeled and submerged in cold water and refrigerated up to 2 days.
For full-size steam pans, multiply recipe x4. Add cooking time.


12.17.2011

Chewy Peppermint Mocha Cookies


During the first two weeks of December, my brain checks out and I go on an "auto-pilot" mode. Two weeks filled with events to cater, my four children's concerts/recitals to attend, class parties, gifts to buy and give, food to cook for my family and my church family.....and oh yeah, I heard there is a thing called Christmas decorating. *CRINGE* I did manage to fish out the Christmas wreath from the attic; still working on the Christmas tree, though....

Now things are slowing down a bit and I can see a small glimmer of light at the end of the tunnel, I can think about these incredibly delicious Chewy Peppermint Mocha Cookies from Eat, Live, and Run, which I made a few weeks ago for our Wednesday Noon Service lunch crowd.  Super easy and super yummy!  


I couldn't resist but to grab several of these Hershey's Kisses Candy Cane at the grocery store.  Aren't they just perfect for Christmas?


In IPC kitchen, we use a large mixing bowl and a hand mixer when making cookies instead of a commercial standing mixer.  We found that it is easier and quicker to mix the baking ingredients this way .  Here, we are mixing the "wet ingredients" together: butter, sugar, eggs, and mint extract.  


Then we measure and sift the "dry ingredients" using a small, hand held strainer.  Make sure the strainer has large mesh opening.


Since we multiplied the cookie recipe by 7, we use gloved hands (open fingers) and gently mix and fold wet and dry ingredients.  This prevents from over mixing the dough, which will cause the cookies to get really tough. Fold until whites of flour is just about gone.  


After baking the cookies for 10 minutes, we quickly pressed the Kisses into the middle, then baked 2 minutes more.


Chewy, minty, and fudgy!  Yep, and I must agree with Adam, Jenna's fiance, whole-heartedly.  These are THE best, fudgiest cookies ever!  Thank you Jenna for another incredibly delicious recipe; this was a huge hit at the church.

Click Here for this recipe!

12.01.2011

Apple Slab Pie with Apple Glaze

"If you want to make an apple pie from scratch, you must first create the universe."
-- Carl Sagan

The late astronomer, Carl Sagan said it correctly, especially if you are to make homemade apple pies for my church family of 300! I think Mr. Sagan was talking about something very brainy and cosmic rather than edible pies, but I really like this quote by him.

Last week, my dear friend, Leigh, sent me a link for this Old-fashioned Apple Slab and said she thought of me and the church. It totally got me excited, especially since I have been wanting so badly to make some apple pies for my beloved church family. Well now with these easy and delicious apple slab pies, I wouldn't have to create the universe first after all!

For the crust, we multiplied Fran's Never Fail Pie Crust recipes by 8 to create 8-double crusts for the half sheet pans (16x12x1), your jelly roll pans will be smaller.


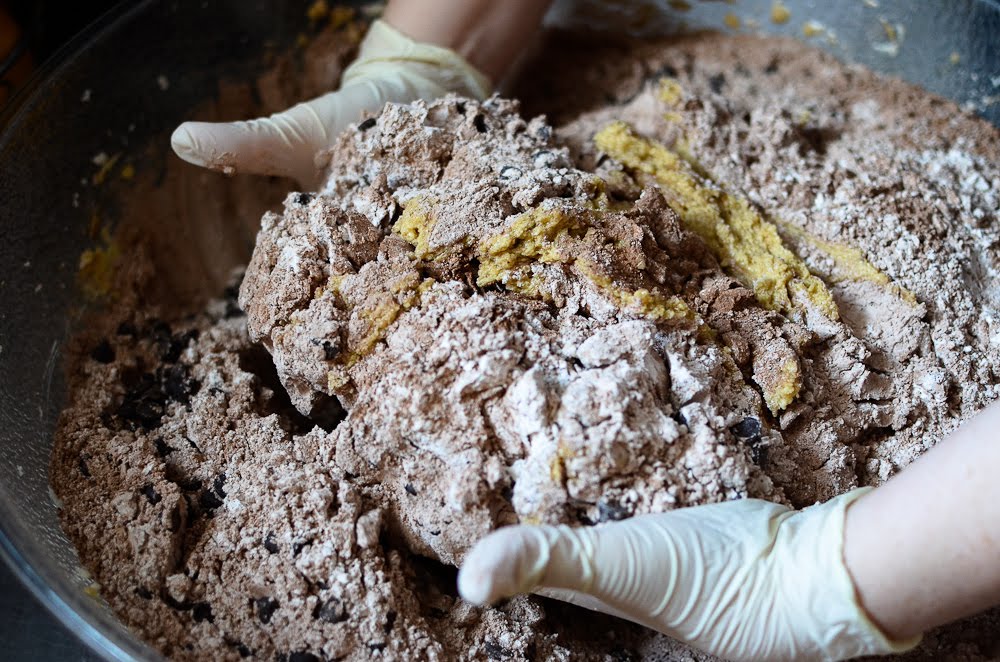
Then to add a bit of sweetness and texture, I added ground up animal crackers during rolling out the dough.


Massive amount of dough was divided into flat 16 rectangular dough blocks and chilled well in the refrigerator. Then it was time to roll these babies out. Sprinkle flour and ground animal cracker crumbs generously on the parchment paper, center it on the paper and begin rolling the dough out: from center, outward.


Thinly rolled out dough can be stacked on a full size cookie sheet and refrigerated (or frozen until needed). Chill while you are working on rolling out the rest of the dough if making large amount.

Take the chilled dough sheet and flip it over the shallow baking pan you are using. It's quite easy to handle this massive dough when you use parchment. Peel off the parchment paper gently.


Trim access dough with scissors and fold and tuck the dough on the edge of the sheet pan, you may need some patch work on the corners. Using your finger, lightly apply water and add pieces of dough where you need it. This can be done days ahead: cover well with plastic wrap and freeze until ready to assemble.


Gala and Granny Smith apples were used for filling. We didn't peel Galas to add some color and texture in the filling. Also, it cut down on our labor since we had to core/peel 45 pounds of apples.

And note these apples in the photo. They were cored and and peeled two days prior to assembling and baking. A little tip on keeping cut apples from turning brown: quick dip in salt water solution (2 cups of water : 1 1/2 teaspoon table salt) will keep them from turning brown for days. Thank you, my BFF for this tip!


Adding tapioca ensured that filling wouldn't be too runny.


Toss sugar, cinnamon, fresh lemon juice and tapioca with sliced apples. Then layer the apples on prepared pans.


The second sheet of chilled dough is topped, trimmed, then gently sealed together. Use fork tines to crimp and seal the two layers. Use a paring knife to cut some vent holes. Brush the tops with egg white, sprinkle with granulated sugar, then bake.


What glorious, shiny crusts with sturdy and most wonderful flavor of apples! And I just loved how it cut so cleanly, too. Drizzle with apple glaze and grab two forks and share it with your best friend.

We will be making these pies for my church family again....for sure.


Apple Slab Pie with Apple Glaze
Yields generous 20 pieces

Pie
1 1/2 cups animal crackers (about 4 oz), processed to coarse crumbs
1 recipe of Fran's Never Fail Pie Crust (or your favorite double pie crust recipe)
8 Granny Smith apples (about 3 1/2 pounds), peeled, cored, thinly sliced
8 Gala apples (about 3 1/2 pounds), cored, thinly sliced (peeling, optional)
1 1/2 cups granulated sugar, extra for sprinkling
1/2 teaspoon salt
6 tablespoons Minute Tapioca
2 teaspoons ground cinnamon
3 tablespoons lemon juice
1 egg white for brushing top crust

Glaze
3-4 tablespoon, frozen apple juice concentrate, thawed
1 1/4 cups confectioners' sugar


1. Divide the dough into two pieces. Shape each piece of crust into a rectangle, cover, and chill for an hour. Take the first piece of pastry out of the fridge, and put it on a floured parchment paper on top of work surface. Generously sprinkle with animal cracker crumbs. Roll it into a large rectangle a bit larger than your pan you are using. Trim the dough to fit the pan and patch the corners with access dough if needed

2. Take the second chilled dough, sprinkle with animal cracker crumbs and roll the dough out on well floured parchment paper. Chill both prepared pan and top crust in the refrigerator while preparing apples. Preheat oven to 350 degrees F.

3. Core, peel, and slice apples. Toss apples in a large bowl with sugar, salt, cinnamon, tapioca, and lemon juice.

4. Layer the apples in the prepared pan. Lay the top crust over and trim access dough. Press the edges together, then use fork to crimp and seal outside edge of pie, then to pierce top of pie at 2-inch intervals. Brush top with egg white and sprinkle with sugar. Bake until pie is golden brown and juices are bubbling, about 1 hour. Transfer to wire rack and let cool 1 hour.

5. For glaze, stir with a fork, confectioners' sugar and apple juice concentrate until well combined. Drizzle glaze evenly over warm pie. Let pie cool completely, at least 1 hour longer. Serve.

Make Ahead Tips:

Days/weeks ahead: Make pie dough, roll the bottom dough out and fit it in pan, cover well and freeze. For top dough, roll it out on parchment paper, lay on cookie sheet, cover well with plastic and freeze until needed.

Up to three days ahead: core and peel apples, dip in salt water solution (2 cups water : 1 1/2 teaspoon table salt. drain in colander, do not rinse, and store in zip lock baggies and refrigerate until ready to slice.

1 day prior: The pie can be made up to 24 hours in advance and refrigerated. Bring to room temperature before serving

NOTE: If your pie crust misbehaves and gets too sticky to work with, don't fight it, stop and REFRIGERATE it! Chilled dough is always easier to work with!